
Disclosure: This post may contain affiliate links. Please read my Disclosure page for more information.
Our easy Korean Ground Beef recipe is a blend of sweet and savory flavors and cooked to perfection in the Instant Pot. This easy weeknight dinner idea can be served in a variety of ways, making it a versatile choice for busy families and picky eaters.
My go-to Korean dishes are bulgogi beef and bbq short ribs. But they’re a little on the spendy side. And I don’t get to enjoy them very often because the nearest Korean restaurant is over 3 hours away (bummer!).

We’re sharing tips to help you get the best results with this recipe. If you don’t need the tips, scroll to the bottom for the full recipe and a printable recipe card.
So I set out to create a dish that allows me to enjoy these amazing flavors at home. While this recipe isn’t authentic Korean cuisine, it does replicate the popular flavors and satisfies the cravings. And it’s made with ground beef, making it an economical choice if you’re on a budget.
One of my favorite things about this pressure cooker beef recipe is that you can cook the ground beef and rice at the same time! Some recipes you find floating around require you to prep the rice on the stovetop, which can be a hassle. I mean, the whole point of using your Instant Pot is to make easy meals with minimal cleanup.
More Easy Instant Pot Recipes…

What You’ll Love about this Instant Pot Korean Beef Recipe
- Quick and easy – it comes together from start to finish in a little over 30 minutes with just 10 minutes of prep time, making it a great choice for busy weeknights
- Budget friendly – ground beef makes this an economical choice
- Can be served many different ways – read until the end for our serving suggestions
- Made with pantry staples – you probably have most of the ingredients on hand
- Leftover and freezer friendly – it’s good for meal prepping and making ahead of time
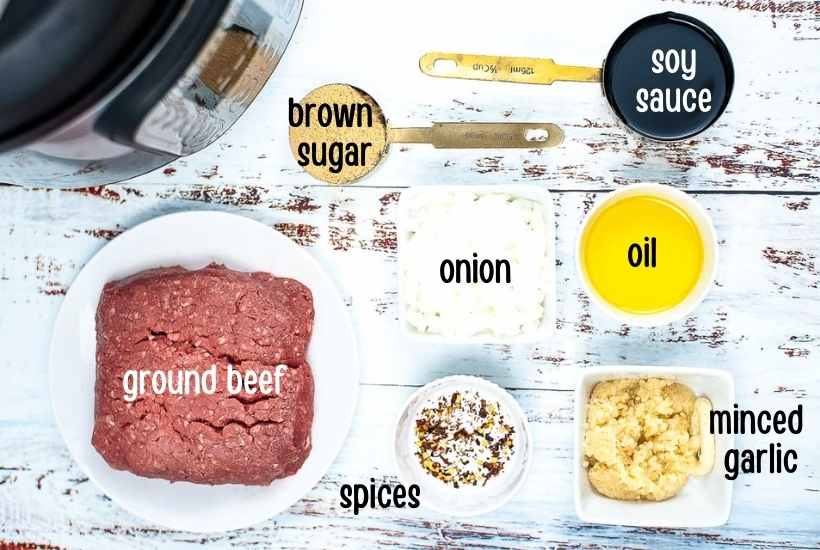
Instant Pot Korean Ground Beef Ingredients
- Meat: lean ground beef (we use a 93/7 blend)
- Spices: minced garlic, red pepper flakes
- Liquids: olive oil, water, low sodium soy sauce
- Other ingredients: ginger paste, brown sugar, yellow onion, long grain white rice
- Optional garnishes: sliced green onions, sesame seeds, Everything But the Bagel seasoning blend
PRO TIP: look for tubes of ginger paste in the produce section of your grocery store.
Get the complete ingredients & directions in the recipe card below.
How to Make Korean Beef and Rice in the Pressure Cooker
Making the sauce: combine the minced garlic, soy, ginger paste, brown sugar, and red pepper flakes in a small bowl and set aside.
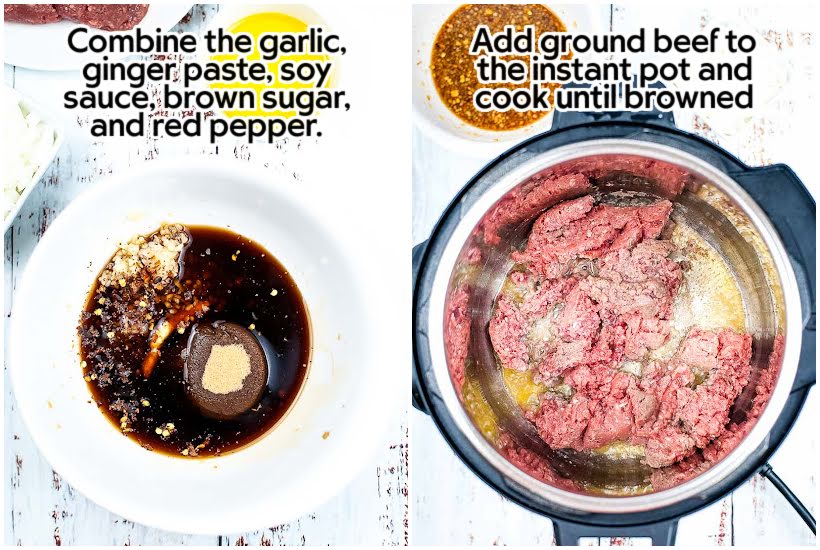
Cooking the beef: press the Saute function button on the Instant Pot and drizzle in the olive oil. Add the lean ground beef once the oil is hot, cooking until it’s no longer pink.

If needed, drain off the excess grease and add the diced onions. Scrape the bottom of the pot to loosen any brown bits that may be stuck to the bottom of the pot. Pour in the sauce and stir to evenly coat the ground beef.
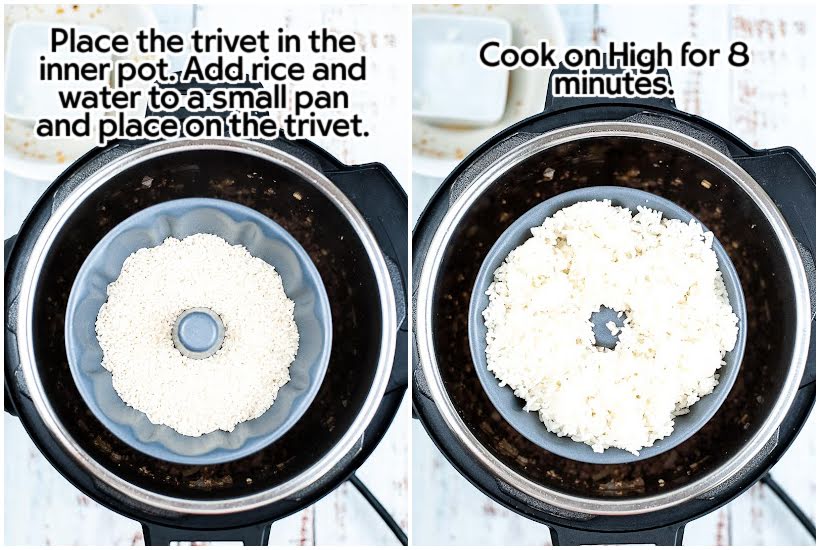
Adding the rice: place the trivet in the inner pot. Pour a cup of water into a small pan, along with a cup of white rice then place the pan on the trivet.
Time to cook: place the lid on the pot, turn to close and switch the valve to the Sealing position. Set the cook time for 8 minutes on High pressure.
Natural release: after the 8 minutes are up, allow the pressure cooker to naturally release for 10 minutes. Then carefully switch the valve to the Venting position to allow the rest of the pressure to release quickly.
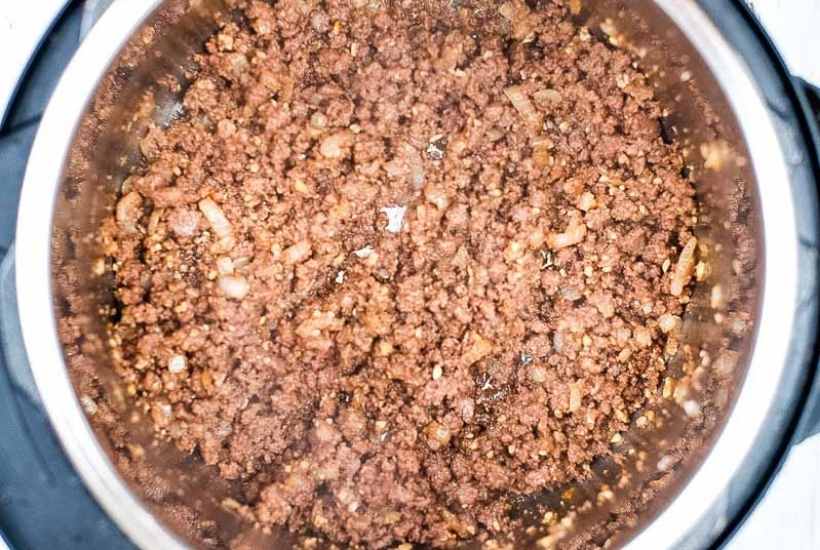
Serving: remove the rice pan and trivet carefully from the inner pot. If you find that the sauce is too thin, you can switch the Instant Pot back to the Saute mode and cook it for a few minutes, until it thickens up. Serve over rice and garnish with green onion and Everything But the Bagel seasoning if using.
Tips to Make Korean Ground Beef in the Instant Pot
- We recommend using lean ground beef in this recipe. If you use a fattier blend, be sure to drain off any grease before adding the sauce.
- If you need to drain the grease, make sure you wipe off the rim and outside of the inner pot to avoid getting a burn notice once the appliance starts coming to pressure.
- My family prefers using Jasmine rice. If you use it, make sure you rinse the rice before using it.
- If using the 6-quart Instant Pot model, a 6-inch pan works great for making the rice. You can also find accessory kits available for purchase – they are made specifically for the Instant Pot. Just be sure to purchase the correct size for the model you have.
- If you don’t want to make the rice, skip those ingredients and steps and proceed as directed.
Best Ways to Serve Korean Beef
Pair it with a side of kimchi slaw and you’ve got a tasty meal on the table in about 30 minutes. And this easy dinner is versatile because you can serve it in a variety of ways. Which also makes it a great choice for your picky eaters.
- Lettuce Wraps – if you’re watching carbs, use baby romaine leaves or butter lettuce cups
- Rice bowls – serve this flavorful beef over cooked white or brown rice
- Korean Beef Bowls – add a variety of sauteed or steamed veggies to round out the dish
- Over cauliflower rice – a tasty low carb option
- With a side of steamed broccoli – because beef and broccoli make the best combo!
- In a tortilla – as Korean beef tacos or rolled up like a wrap or burrito
- Over soba noodles or zucchini spirals
Can you substitute the ground beef?
Yes! You can substitute ground turkey or chicken in place of the ground beef. You’ll follow the same instructions as if you were using beef.
Can this easy Korean ground beef recipe be doubled?
Depending on the model of your pressure cooker, yes. You never want to fill the inner pot over the max fill line, so this may not be an option for smaller models.
If you choose to double the ground beef portion, you may not be able to fit the rice in, which can be cooked separately if needed.

Storing and Reheating Leftover Asian Beef
I like to store Korean beef separately from the rice unless I am taking it for lunch the next day. It will stay fresh when stored in an airtight container for up to 3 days after you make it.
When reheating leftovers you can add the ground beef mixture back to a skillet on the stove top and warm over low heat or heat it in the microwave for a couple minutes.
For freezing, allow the Korean beef to cool completely, then add to a freezer safe container. It will stay fresh for up to 3 months. When you are ready to serve, allow it to thaw overnight in the fridge and warm up on the stove top or in the microwave.
This easy dinner recipe is perfect for busy weeknights or anytime you need a quick meal. And it’s sure to become a family favorite, earning a place in your regular dinner rotation.
MORE FAMILY Favorite
Ground Beef Recipes

Enter your email & I’ll send it to your inbox. Plus, get great new recipes from me every week!

Instant Pot Korean Ground Beef
Equipment
Ingredients
- 2 tablespoons minced garlic
- 1/2 teaspoon ginger paste
- 1/2 cup low sodium soy sauce
- 1/4 cup lightly packed brown sugar
- 1/2 teaspoon red pepper flakes
- 1 tablespoon olive oil
- 1 pound lean ground beef
- 1/2 medium yellow onion, diced
- 1 cup water
- 1 cup long grain white rice, rinsed
- 1 tablespoon Everything But the Bagel seasoning blend, optional, for garnish
- green onion, chopped, optional, for garnish
Instructions
- Combine the garlic, ginger paste, soy sauce, brown sugar, and red pepper in a small mixing bowl. Set aside.2 tablespoons minced garlic, 1/2 teaspoon ginger paste, 1/2 cup low sodium soy sauce, 1/4 cup lightly packed brown sugar, 1/2 teaspoon red pepper flakes
- Set the Instant Pot to Sauté and add the oil. Once oil is hot, add the ground beef and cook until meat is browned. Add the chopped onion.1 tablespoon olive oil, 1 pound lean ground beef, 1/2 medium yellow onion
- Add sauce seasoning mix and stir to coat the meat mixture.
- Place the trivet in the inner pot. Add 1 cup of water and 1 cup of rice to a small pan and place on the trivet.1 cup water, 1 cup long grain white rice
- Close the lid, turn to lock it and set the pressure valve to Sealing. Cook on High for 8 minutes.
- Allow pressure to release naturally for 10 minutes. Then carefully turn the pressure valve to Venting and quick release any remaining pressure.
- Carefully remove the pan of rice.
- If the sauce is thin, cook for a few more minutes on Saute mode, until the sauce has thickened.
- Garnish with Everything But the Bagel seasoning and green onion if using.1 tablespoon Everything But the Bagel seasoning blend, green onion
Notes
- We recommend using lean ground beef. If you use a fattier blend, be sure to drain off any excess grease and wiping out the inner liner before adding the sauce.
- Substitute ground turkey or chicken for the hamburger.
- A 6-inch pan works well with the 6-quart Instant Pot pressure cooker.
- If you don’t want to make the rice, omit those ingredients and steps and proceed as directed.
- Store leftovers in an airtight container for up to 3 days.
- Serving options: lettuce wraps or cups, beef bowls with steamed veggies or over cauliflower rice.
Nutritional Estimate
Nutritional information is provided as a reference, using an online calculator. We recommend verifying the information independently for accuracy.