Disclosure: This post may contain affiliate links. Please read my Disclosure page for more information.
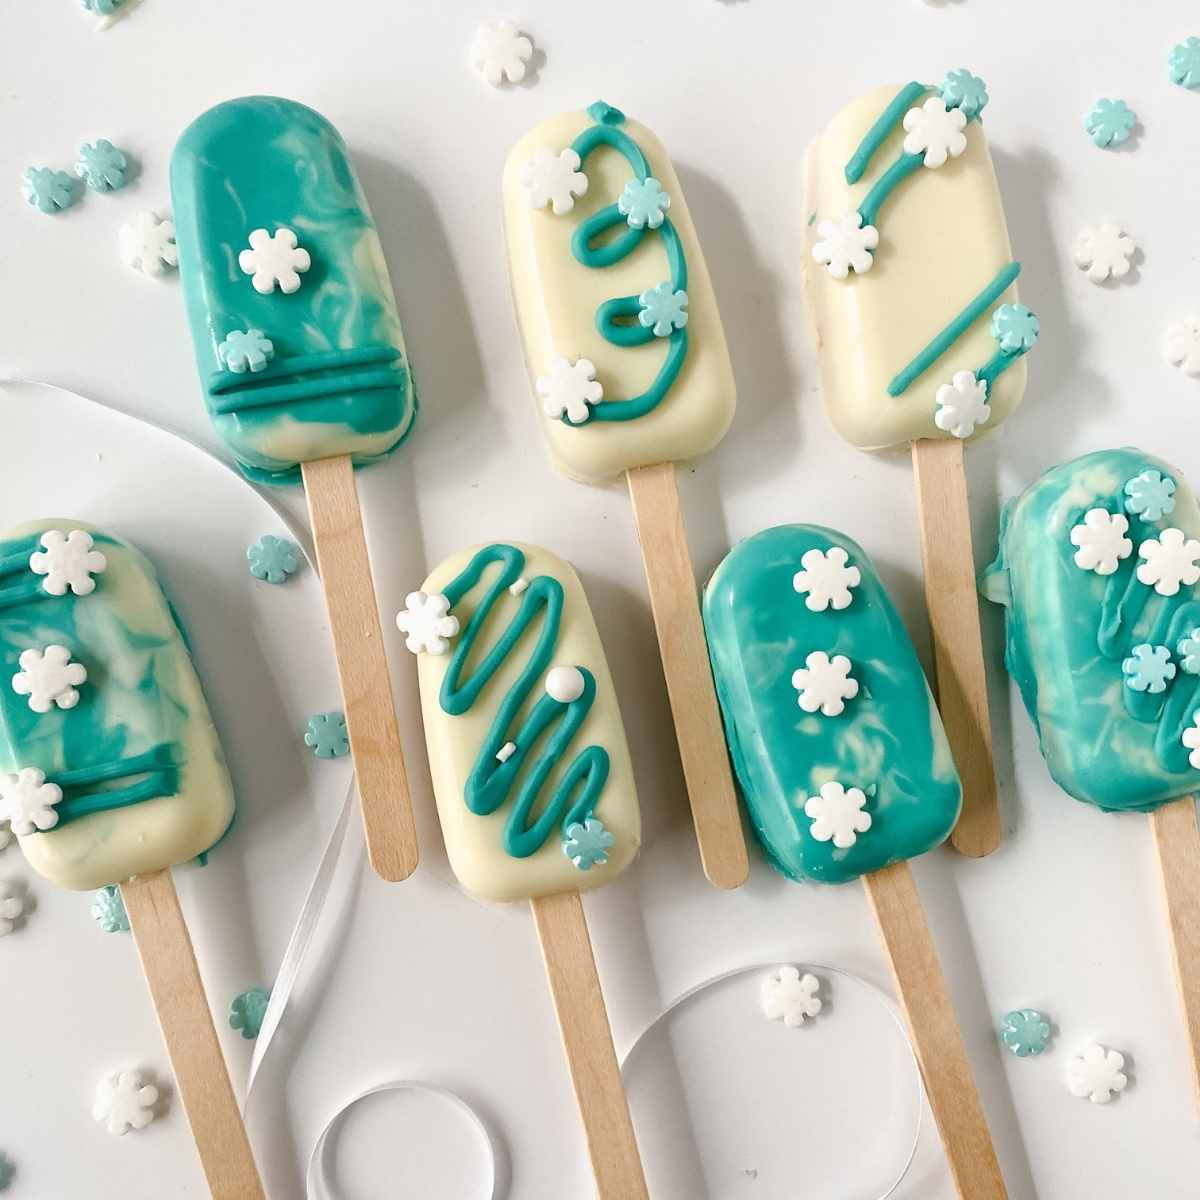
Impress your friends and family with these Winter Wonderland Cakesicles. They’re fun to make, add a festive touch to your dessert table and are sure to put you into the holiday spirit.
Before we go any further, I just have to say that if you have a little one who loves the Frozen movie, these are sure to be a hit. While they look really festive for the winter and holiday season, you can also use this recipe for Frozen-themed parties throughout the year.
We’re sharing tips to help you get the best results with this recipe. If you don’t need the tips, scroll to the bottom for the full recipe and a printable recipe card.
BUT you also don’t need to have a party at home to make these! Kids love helping in the kitchen and this is an easy dessert treat that they can help make.
Speaking of kids, if you need an easy idea for a winter school bake sale or want to send in homemade treats for a class party, cakesicles are the answer! They’re versatile and can be made for any occasion, like these Heart Shaped Cakesicles for Valentine’s Day.
Winter Wonderland Cakesicles Ingredients Needed
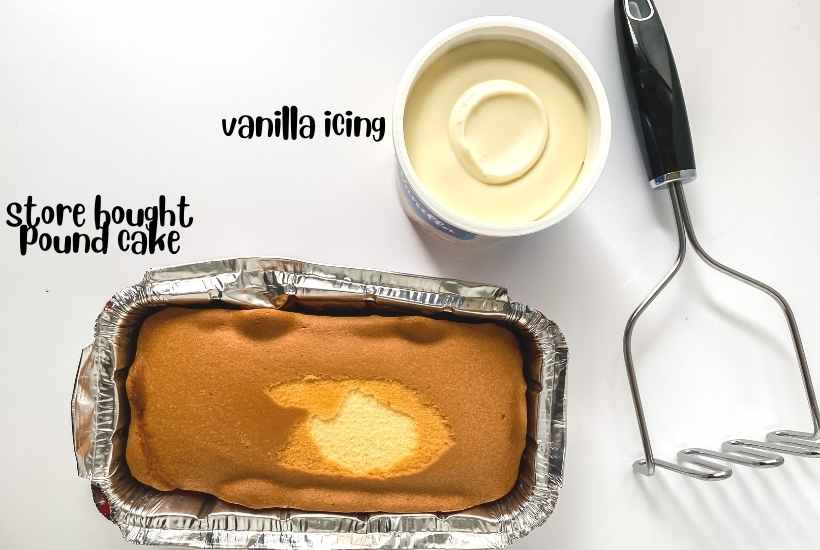
- Pound cake – I used a store-bought cake to save time but feel free to make a homemade version if you have a favorite recipe.
- Vanilla icing – a store-bought frosting is convenient and the texture is consistent.
- Blue-colored candy melts
- White almond bark or candy coating
- Snowflake sprinkles – feel free to use your favorite sprinkles.
Helpful Kitchen Gadgets to Make This Recipe
- Popsicle sticks
- Parchment lined baking sheets
- Piping bags
- Silicon melting pots (optional) – these are recommended if younger kids are helping with this recipe.
- Microwave-safe bowls with lids
- Ice cream silicone molds – we like working with this mold shape because it’s a nice sized treat and easy to adapt for other occasions.
Get the complete ingredients & directions in the recipe card below.
How to Make Winter Wonderland Themed Cakesicles Recipe
Making the Cake Mixture
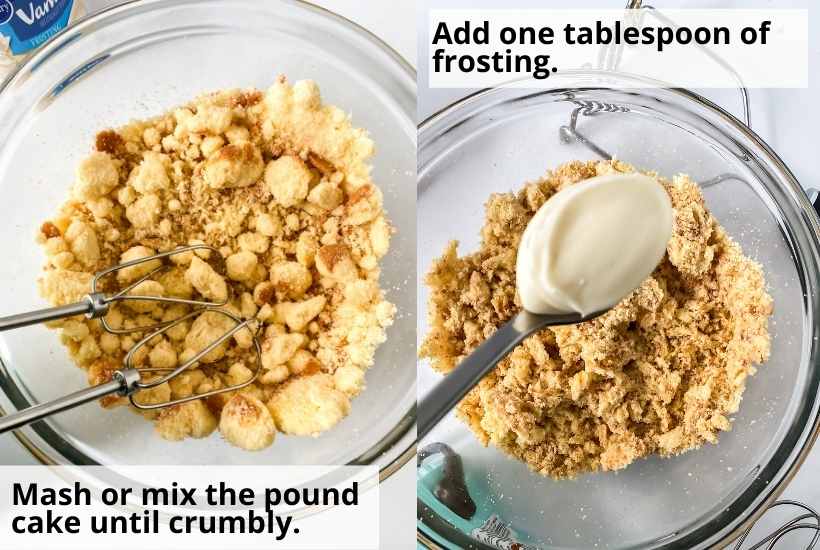
Place the pound cake in a large mixing bowl and mash it by hand or use an electric mixer until it’s crumbly.
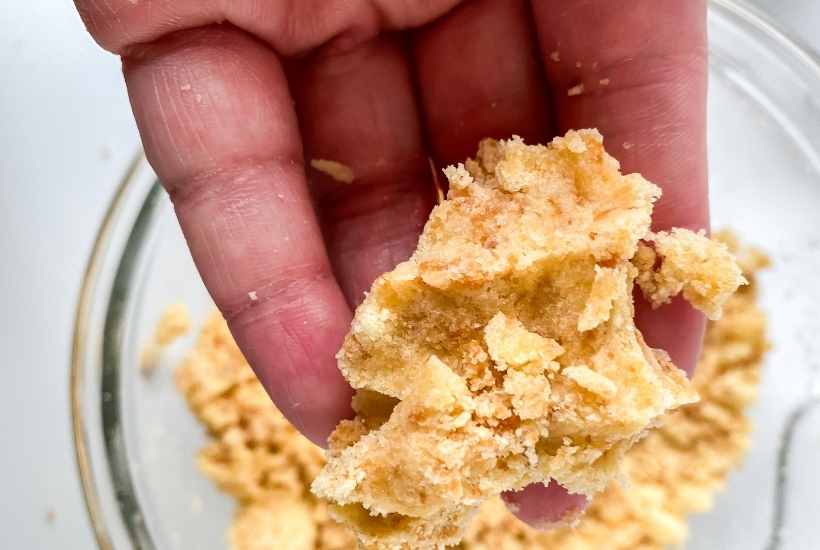
Add about a tablespoon of frosting, then stir together. Don’t use too much, you only want enough for the mixture to stick together.
Coating the Molds
In microwave-safe bowls or silicone pots add the blue candy melts to one and the almond bark to another. Microwave for 1 minute, stirring at the 30-second mark.
After a minute, stir the candy/chocolate until it’s smooth. If needed you can continue to cook in 15-second increments.

Be careful to not overcook the chocolate or it may burn or break down. Sometimes you can add a little coconut oil if it needs thinning.
If you are using the melting pots, pour about a spoonful of melted candy into the mold. Spread it up the sides of the mold with a food-grade paintbrush or the back of a spoon. If you aren’t using melting pots, just spoon the chocolate into the molds.
Make sure the center and the sides are covered well, adding more chocolate if needed. If the layer is too thin you may experience cracking in the chocolate.
How to Get a Marbled Effect
Add the white and blue chocolate to the mold and swirl the colors together with a butterknife, toothpick, or spoon.
Assembling the Cakesicles
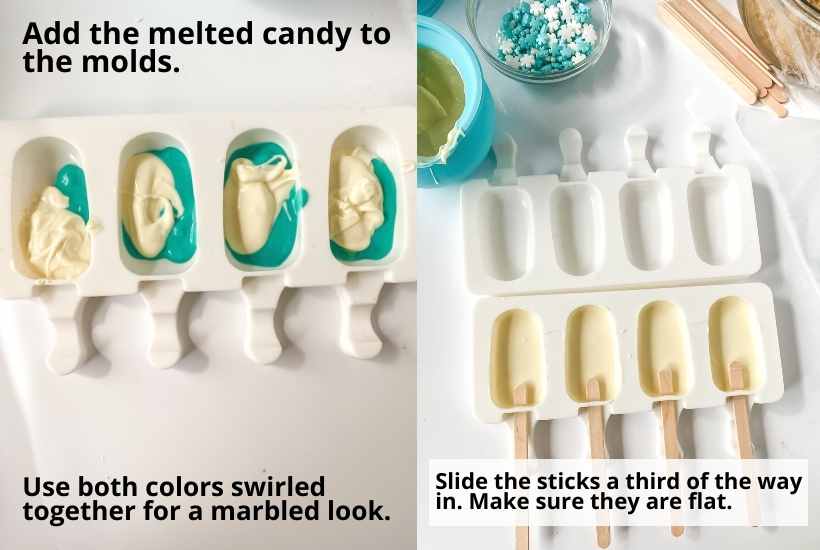
Insert the popsicle sticks a third of the way into the mold. Make sure the sticks are laying flat (you don’t want the sticks to point downward). They should hover just above the chocolate layer.
Set the filled mold in the freezer, sitting flat, for 15 minutes.
Then take them out of the freezer and carefully add a spoonful of cake mixture without overfilling. Press the cake down gently, trying not to break the chocolate layer. Leave a little space at the top for the final layer of chocolate.
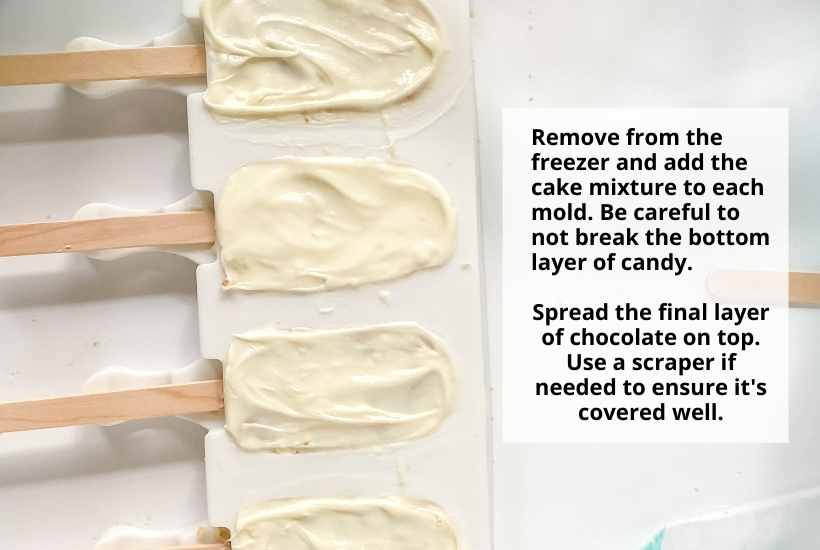
Spread a thin layer of chocolate, smoothing it with a scraper and cleaning the edges as much as possible. Place them back in the freezer for an additional 5 minutes or until the chocolate has hardened.
Removing Cakesicles From the Mold
After the chocolate has set up, remove them from the freezer. Loosen the corner of the mold, carefully starting at the top and peeling it back.
Give the sticks a gentle push then transfer them to a baking sheet lined with parchment paper.
Decorating the Cakesicles
Melt the blue chocolate melts in the microwave, cooking in 15-second increments and stirring after each heat cycle, until it’s smooth.
Pour it into a piping bag, then cut off the tip of the bag. Pipe lines and circles across the top.
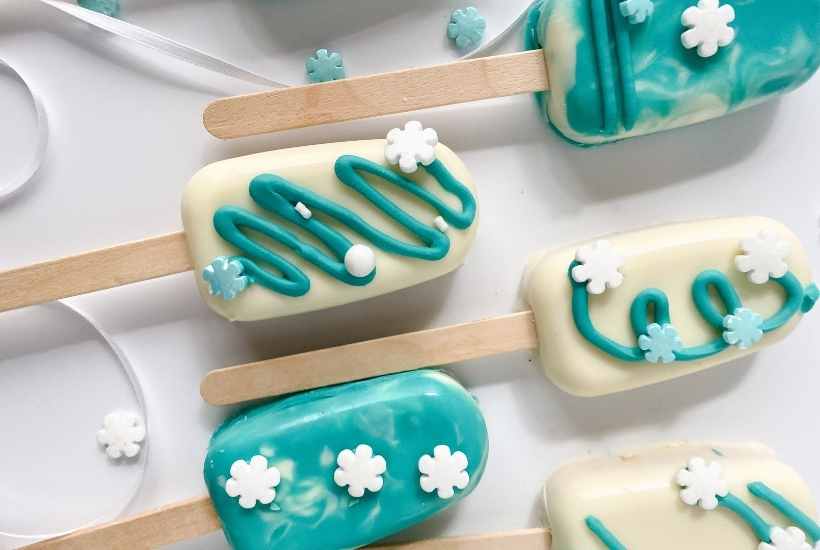
Immediately add the snowflake sprinkles before the chocolate sets.
Allow the cakesicles to set up and dry completely before serving or storing. This should take about 30 minutes.
Tips for Making Cakesicles
- It’s easier to work in batches of 8, using 2 molds.
- The recipe yield will vary based on the size of your mold and how much dough you use per cakesicle.
- If working with kids we recommend using the melting pots – it’s a safer way for them to help.
What happens if the stick is loose or comes out?
Remove the popsicle stick from the mold, dip it in melted chocolate and reinsert in the cakesicle. Let it sit for 10-15 minutes for the chocolate to set up.
Troubleshooting Tips for Cakesicle Problems
- If the chocolate cracks when removing: peel the chocolate off. If the chocolate came off cleanly (no cake is in the chocolate), remelt it and start over.
- The sides are not fully covered: Dab a bit of the melted chocolate onto the exposed areas and allow to dry.
- Extra chocolate on the outer edges: carefully trim it away using a sharp knife or a pair of clean kitchen scissors
- To prevent fingerprints on the chocolate: avoid touching the coated cakesicles to prevent fingerprints or use gloves when handling.
How to Store Cakesicles
Cakesicles should be stored in an airtight container on the counter for 4-5 days. They can also be stored in the refrigerator for up to a week.
Recipe Variations
- Change the cake flavor to coordinate with the celebration or holiday: red velvet or strawberry for Valentine’s Day or Christmas, pistachio for St. Patrick’s Day, rainbow chip for birthdays or use a white cake mix and color it with food coloring.
- Tailor the decorations: change the chocolate colors and sprinkles. You can let your imagination run wild because the options are limitless.
More Festive Desserts & Treats:
- Little Debbie Christmas Tree Dip
- Grinch Edible Sugar Cookie Dough
- Crockpot Christmas Crack
- Cornflake Wreaths {No Bake}
- Candy Cane Pie

Enter your email & I’ll send it to your inbox. Plus, get great new recipes from me every week!

Winter Wonderland Cakesicles
Equipment
Ingredients
- 1 pound cake, store-bought or homemade
- 1 tablespoon vanilla frosting
- 1/4 cup blue-colored candy melts
- 1/4 cup white almond bark or candy coating
- snowflake sprinkles
- additional candy melts for decorating, optional
Instructions
To Make the Cake Mixture:
- Mash the pound cake with a mixer or by hand with a potato masher until fine crumbs are achieved. Add a spoonful of frosting and stir. You want just enough frosting for the mixture to come together.1 pound cake, 1 tablespoon vanilla frosting
To Make the Cakesicles:
- Place the candy melts/almond bark in separate, microwave-safe bowls (or silicon pots if using). Melt for 1 minute, stirring at the halfway mark. After 1 minute, stir again until smooth. Continue heating in 15 second increments until the chocolate is smooth.1/4 cup white almond bark or candy coating, 1/4 cup blue-colored candy melts
- Place 1 spoonful of melted chocolate into molds (or pour candy from the melting pots if using). Spread candy up the sides of the mold with the back of a spoon or a food-safe paintbrush. Make sure the sides and center are well covered. Add more chocolate if needed. For a marbled effect: place white and blue chocolate in the mold. Use a butter knife, spoon or toothpick to swirl the colors together.
- Slide the popsicle sticks about a third of the way into the mold, making sure the sticks are flat and not pointing downward (the sticks should hover above the chocolate layer). Place mold in the freezer for 15 minutes, making sure the mold is flat.
- Remove trays from the freezer. Add a spoonful of the cake mixture, being careful not to overfill the mold. Press gently into the mold, being careful not to break the chocolate layer. Leave a little room at the top for the final layer of chocolate.
- Cover the back with a layer of melted chocolate. Smooth the layer with a bench scraper and clean up the edges as much as possible. Freeze for another 5 minutes, until the chocolate is hardened.
To remove from the mold:
- Carefully loosen one of the corners. Starting at the top of the mold, gently peel the mold from the cakesicle. Carefully push the sticks up through the mold. Place cakesicles on a parchment-lined baking sheet.
Decorating the cakesicles:
- Melt the blue chocolate and add it to a piping bag. Cut a small hole in the bag. Draw lines and circles across the top of the cakesicle. Immediately add snowflake sprinkles and allow to dry completely (about 20-30 minutes).snowflake sprinkles, additional candy melts for decorating
Notes
- We recommend using the melting pots if working with young children.
- Recipe yield will vary based on the size of the mold.
- See the blog post for tips for making and troubleshooting problems.
- Change the cake flavor or decorations to coordinate with other holidays or celebrations.
Nutritional Estimate
Nutritional information is provided as a reference, using an online calculator. We recommend verifying the information independently for accuracy.