
Disclosure: This post may contain affiliate links. Please read my Disclosure page for more information.
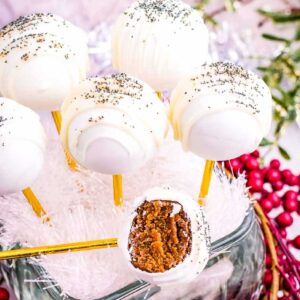
Celebrate the holiday season with our delectable Gingerbread Cake Pops. Imagine the festive flavors of gingerbread cookies packed into a bite-sized dessert. Perfectly spiced and irresistibly sweet, this festive treat is like Christmas on a stick!
So what’s so special about these gingerbread cake pops? First, they’re packed with warm spices like ginger, cinnamon, and nutmeg. And these spices give them the classic gingerbread flavor we adore at the holidays.
Be sure to try our gingerbread snack mix, cookie butter truffle recipe and copycat Starbucks gingerbread loaf if you like warm spice flavors. And these easy cake mix fruitcake cookies are a tasty addition to your holiday cookie trays.
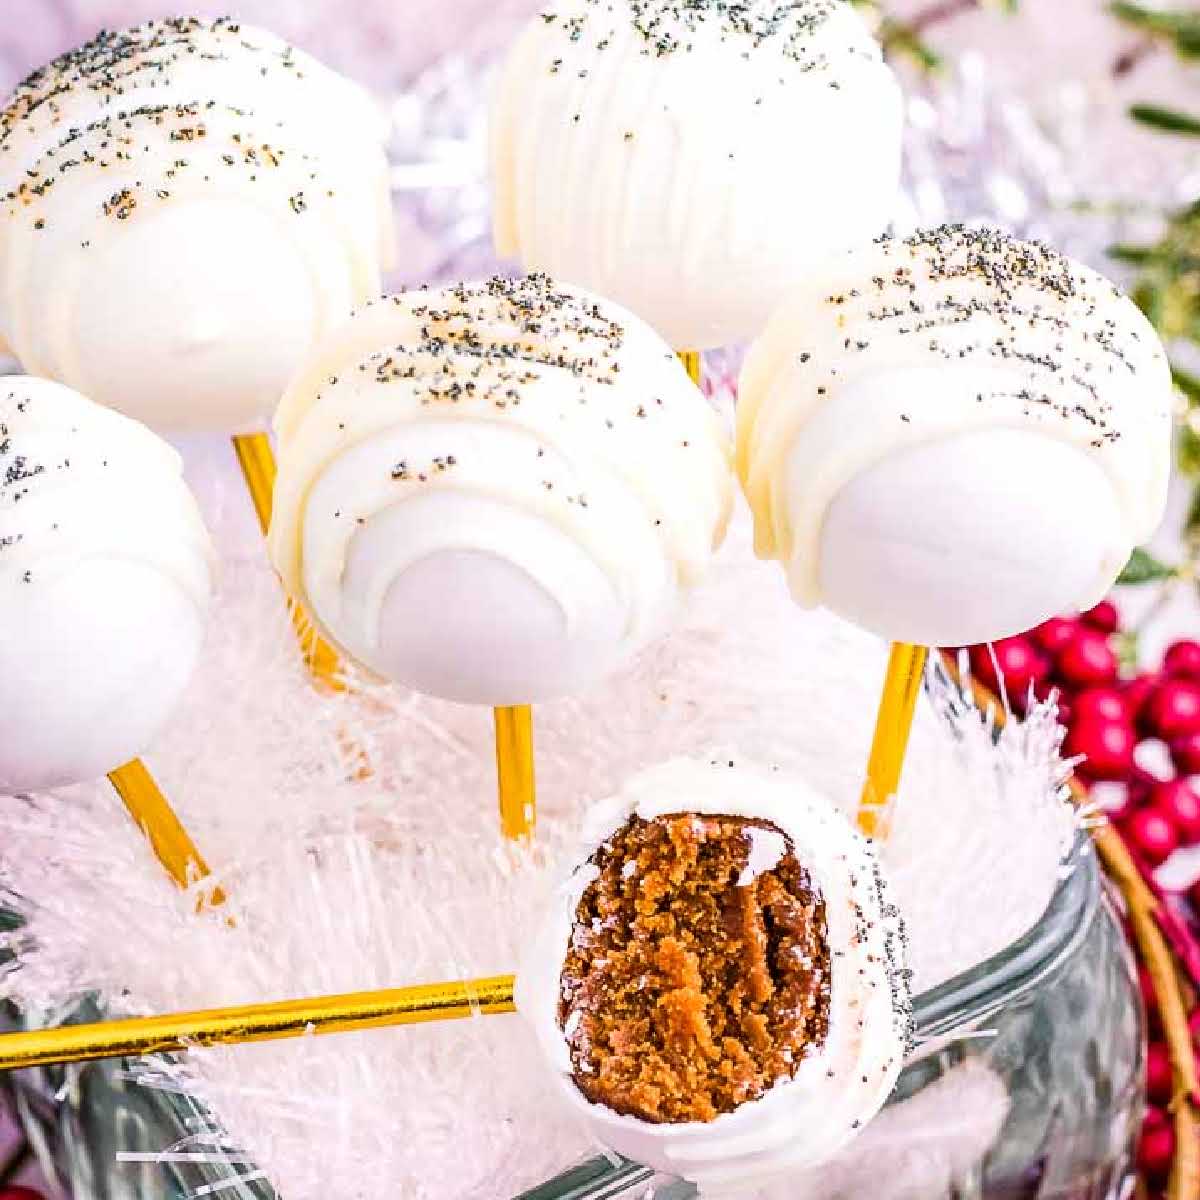
Then there’s the texture. The homemade cake is soft and delicious, and the candy coating adds a satisfying crunch when you bite into it.
And let’s not forget the visual appeal with the festive sprinkles! These gingerbread cake balls are sure to be the star of your Christmas party or family gathering.
So why should you make these? Well, besides being insanely delicious, they’re a pretty addition to your holiday dessert tray. Plus they’re easy to eat while mingling. And because they’re easy to make you can turn this into a fun activity and have your kids help.
We’re sharing tips to help you get the best results with this recipe. If you don’t need the tips, scroll to the bottom for the full recipe and a printable recipe card.
If you don’t want to add the sticks, you can leave them as is and serve them like cake bites (similar to red velvet cake pops, oreo balls and cookie dough truffles). However, keep in mind everyone likes food on a stick, especially kids!
Gingerbread cake pops make excellent edible homemade gifts for the holiday season. They’re a perfect little present for teachers, neighbors, or hostess gifts. Just wrap them in clear cello bags and tie with a pretty ribbon. Or make a pan of classic old fashioned gingerbread or gingerbread blondies if you’re hosting a holiday brunch.
Gingerbread Cake Pops Ingredients
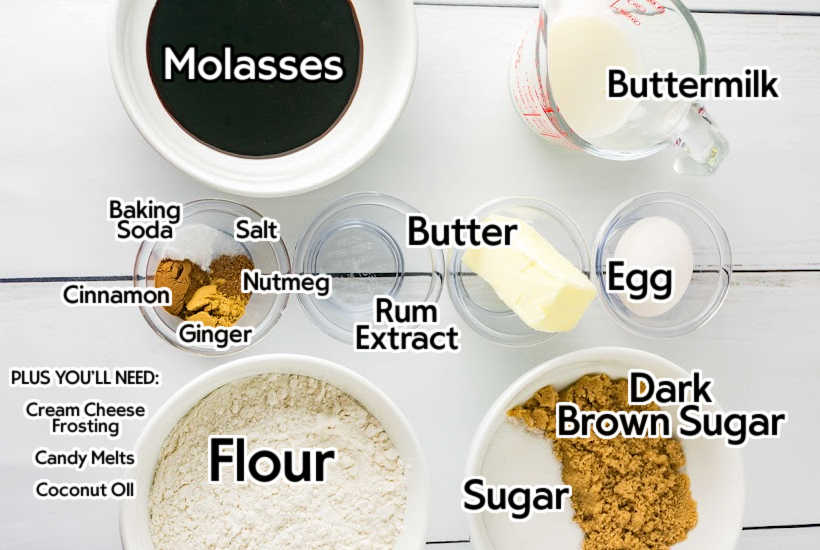
Homemade Gingerbread Cake:
- unsalted butter – allow time for it to come to room temperature so mixing is easier
- dark brown sugar – provides a rich flavor
- granulated sugar
- egg – room temperature
- molasses – give depth to the flavor
- buttermilk
- rum extract
- baking soda
- spices: ground cinnamon, ground ginger and ground nutmeg
- salt
- water
- flour – we used all-purpose with this recipe
- cream cheese frosting – use homemade cream cheese frosting or store bought.
Coating for the Cake Balls:
- white candy melts – can use other holiday colors if preferred
- coconut oil
Kitchen Gadgets Needed to Make Cake Balls
- 8-inch cake pan – to bake the homemade cake
- lollipop sticks – to place the cake bites on
- cake pop stand – these stands are specifically for making cake pops and keep them upright while the chocolate is setting
- holiday sprinkles – optional, but fun for decorating
Get the complete ingredients & directions in the recipe card below.
How to Make Gingerbread Cake Pops
Preheat the oven to 325 degrees F. Grease and line an 8-inch cake pan with parchment paper.
Cream the softened butter and sugars together in a large mixing bowl using an electric mixer on medium speed.
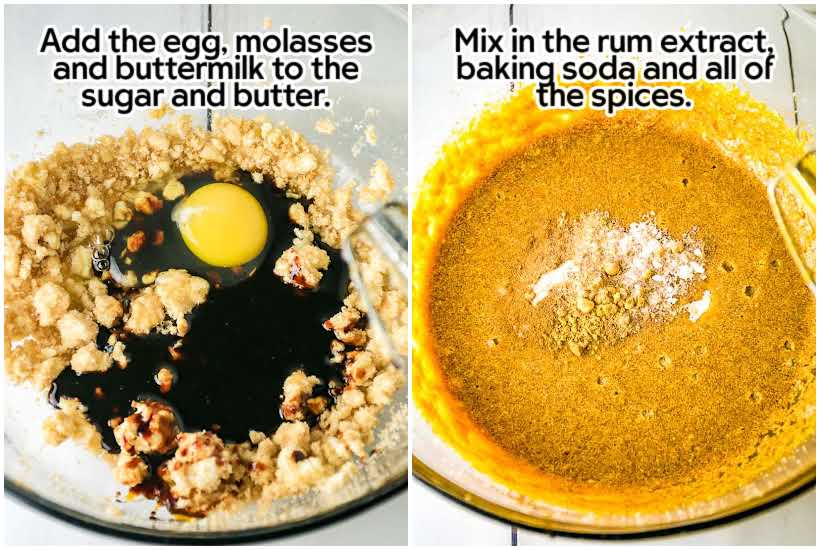
Add the egg, buttermilk, and molasses, mixing after adding each ingredient.
Stir in the spices, rum extract, and baking soda.
Pour in the water and mix well.
Add a ¼ cup of flour at a time and continue mixing until the batter is combined and smooth.
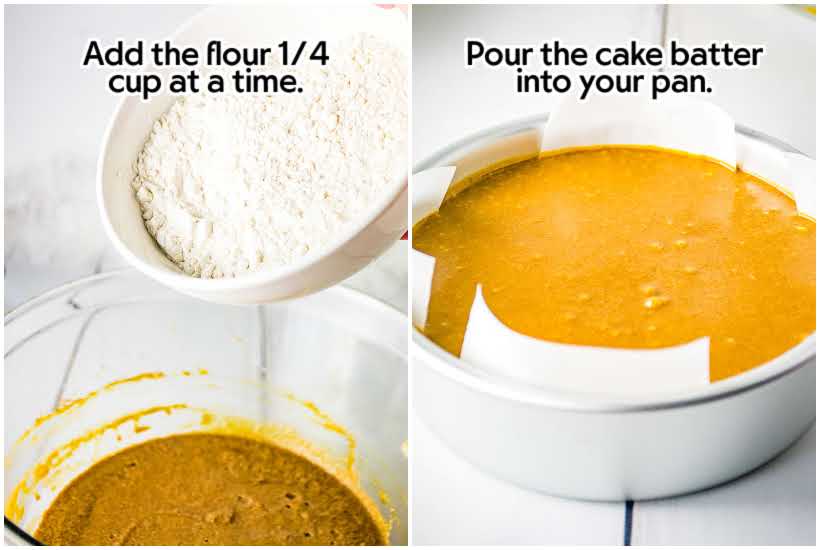
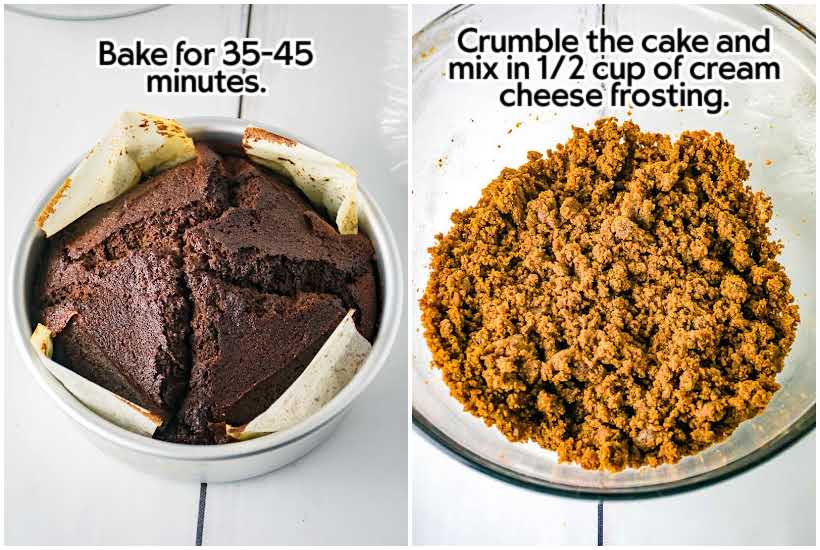
Transfer the cake batter to the prepared pan and bake for 35-45 minutes or until a toothpick inserted in the center comes out clean. Allow the cake to cool completely on a wire rack before proceeding.
Once the gingerbread cake has cooled, remove the cake from the pan and crumble it into a large bowl until you’ve got fine crumbs. Add ¼ cup of the cream cheese frosting to the crumbled cake and mix until the cake holds its shape.
Line a cookie sheet with parchment paper and set aside.
Take 1-2 tablespoons of the cake pop mixture and roll into balls (a cookie scoop works great for this).
How to Shape and Decorate the Cake Balls
Melt 10 candy melts in a small bowl in the microwave. Dip one end of the cake pop sticks into the melted candy, insert it halfway into the gingerbread ball and place on the lined baking sheet. Repeat until each cake pop has a stick.
Place the baking sheet in the refrigerator and chill the cake pops for 30 minutes.
Melt the remaining candy melts with a teaspoon of coconut oil. Use a tall glass or cup that is deep enough to cover the cake balls when dipping.
Dip the cake pops into the melted chocolate. Twirl and gently tap the stick on the edge of the glass to remove the excess chocolate.
Place the coated cake pops in a stand or a piece of styrofoam to set.
Once all of the cake pops have been dipped in the chocolate coating, chill for 10 minutes until the coating has set up.
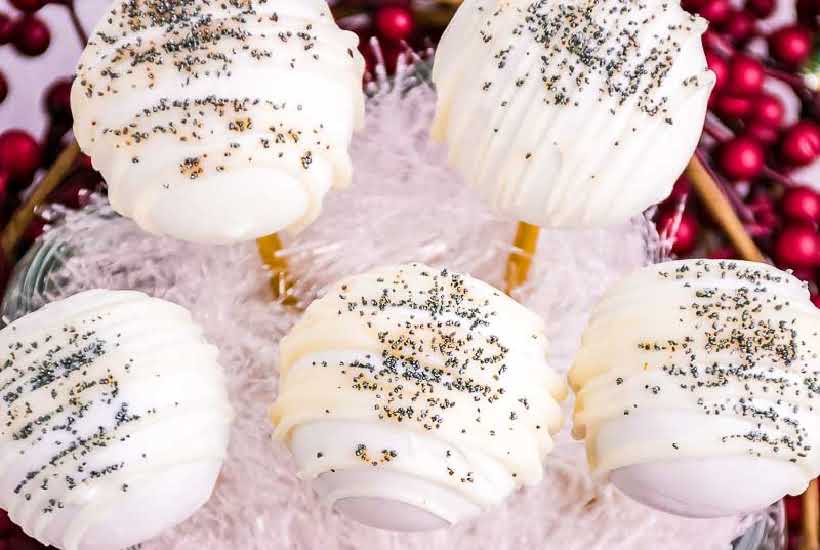
Decorate with the remaining melted white chocolate (a piping bag works great for this) and sprinkles.
Tips for Making Gingerbread Cake Balls
- Only add enough frosting so the cake crumbles hold the shape. Too much frosting will make them mushy and heavy, which may cause them to fall off the sticks.
- I used a kitchen scale to weigh the cake balls. Mine were about 40 grams each.
- If you don’t want the bottoms to be flat, store on a foam tray while making the cake pops.
- Once you have dipped the cake bites in the chocolate, rotate the ball while you lift it out to even out the chocolate layer.
- If you’re short on time, you can use a boxed gingerbread cake mix, then skip ahead to adding the icing, dipping, and decorating.
Recipe Variations
The beauty of these gingerbread cake balls is that you can customize them to match your party decor. Use different colored candy melts for the coating, like red and green for a classic Christmas look. For Hanukkah, use blue and white. And for a lively, festive vibe, use multiple colors.
You can also play around with different types of sprinkles. For a minty flavor, consider adding crushed candy canes. Create a snow-like effect by adding sparkling sugar. Or add a pop of color with festive nonpareils.
More easy holiday treats…
Can I make cake pops ahead of time?
Yes! To make the cake balls ahead of time, follow the instructions up until you add the sticks. At this point you can place them on a baking sheet in the freezer for 30 minutes to flash freeze. Then transfer them to a freezer storage bag.
Allow them to thaw in the fridge overnight before decorating and dipping.
How to Store Cake Pops
Keep leftover cake pops in an airtight container in the refrigerator for up to 3 days.
So that’s it! These Christmas cake pops are as fun to make as they are to eat. Grab an apron, put on your holiday playlist and make a batch today. They’re sure to be a hit at your next holiday party.

This recipe was featured at Senior Salon Pit Stop and Create Bake Grow and Gather.
Enter your email & I’ll send it to your inbox. Plus, get great new recipes from me every week!
Gingerbread Cake Pops
Equipment
Ingredients
- 1/3 cup butter, room temperature
- ¼ cup dark brown sugar
- 3 tablespoons granulated sugar
- 1 large egg
- 1/3 cup molasses
- ¼ cup buttermilk
- ½ teaspoon rum extract
- ½ teaspoon baking soda
- 1 teaspoon ground cinnamon
- 1 teaspoon ground ginger
- ¼ teaspoon ground nutmeg
- pinch of salt
- ½ cup water
- 1 cup all-purpose flour
- ¼ cup prepared cream cheese frosting, homemade or store bought
- 2 cups white candy melts
- 1 teaspoon coconut oil
Instructions
- Preheat oven to 325 degrees Fahrenheit.
- Spray an 8-inch cake pan with non-stick spray and line with parchment paper. Set aside.
- Using an electric mixer, cream the butter and sugars until smooth.
- Add the egg, molasses and buttermilk, mixing between the addition of each ingredient.
- Next mix in the rum extract, baking soda and all of the spices.
- Add in the water and mix until well combined.
- Add the flour ¼ cup at a time, mixing after each addition.
- Pour cake batter into the prepared pan.
- Bake for 35-45 minutes, until a toothpick inserted in the center comes out clean. Remove from the oven and allow to cool completely on a wire rack.
- After the cake has cooled, crumble it into a large bowl until you get fine crumbs.
- Add in ¼ cup of cream cheese frosting and mix until the mixture holds it’s shape.
- Take 1-2 tablespoons of the cake mixture and roll into a ball with the palms of your hands (a cookie scoop works great for this). Continue until you’ve used all the cake mixture.
- Cook about 10 candy melts in the microwave, just until melted.
- Dip one end of the cake pop stick into the melted chocolate and insert the stick about halfway into a cake ball. Continue with the remaining cake balls. Chill for 30 minutes.
- Melt the remaining candy melts with 1 teaspoon of coconut oil in a glass measuring cup or a tall skinny glass.
- Dip chilled cake pops into the melted chocolate, twirling and gently tapping the stick on the side of the glass to remove excess chocolate. Place coated cake pops into a stand or into a piece of Styrofoam.
- After all of the pops have been dipped, chill again for 10 minutes before decorating.
- Remove cake pops from the refrigerator and decorate with a white chocolate drizzle and sprinkles if using.
Notes
- Add just enough frosting to hold the cake together. If you add too much the cake balls will be too wet and greasy to stay on the stick.
- For best results, make the cake pops a similar size. I use a cookie scoop or food scale to weigh the cake mixture (40 grams for each cake pop).
- Don’t freeze the cake pops before dipping them or the chocolate coating may crack. If they are frozen, allow them to sit out for 15 minutes before dipping.
- For even coverage of chocolate, slowly rotate the pop while raising from the chocolate and gently tap off the excess chocolate. This also helps to level out the chocolate.
- Place pops on a foam tray or cake pop stand while making the cake pops if you don’t want them to have flat bottoms.
- The number of cake pops will vary based on the size of your cookie balls.
- Storage: store finished cake pops in an airtight container in the refrigerator for up to 3 days.
Nutritional Estimate
Nutritional information is provided as a reference, using an online calculator. We recommend verifying the information independently for accuracy.
You’d be hard fetched to find someone that doesn’t love a cake pop, Lori.
Thank you for sharing your Gingerbread Cake Pops recipe at Create, Bake, Grow & Gather this week. I’m delighted to be featuring your recipe at today’s party and pinning too.
Happy Holidays ~ Kerryanne
Everything tastes better on a stick, right?! Thanks for featuring my recipe Kerryanne.
Popping in quickly to let you know that your awesome post will be featured Monday at SSPS 338
Thanks for featuring the cake pops, Esme!
Love the small cake pops, perfect for the grandkids
Thank you for sharing and participating at SSPS 337. See you at #338
Food just tastes better in small sizes, doesn’t it?
Such a fun recipe! I will definitely try this one out for my Dad’s bday as gingerbread is his favorite!
Don’t forget to join us over at the Creatively Crafty Linky Party every Wednesday through Sunday
Pinned!
Creatively, Beth
Thanks, Beth. I hope your Dad likes them!