
Disclosure: This post may contain affiliate links. Please read my Disclosure page for more information.
Valentines Day Oreo Pops are fun to make, budget-friendly, and an easy holiday dessert your entire family will love. What better way to spread the love than with festively decorated Oreos.
One thing that I love the most about this easy Valentine’s Day recipe is that it only requires 4 ingredients. And from start to finish you’ll only need about 30 minutes.

We’re sharing tips to help you get the best results with this recipe. If you don’t need the tips, scroll to the bottom for the full recipe and a printable recipe card.
These are also great for parties at school. You know, when you need to whip up something quick because your kids remind you about the party at 8PM the night before? We’ve all been there, right?! Try these homemade chocolate peanut butter hearts are another easy treat idea.
Our Favorite
Valentine Recipes
If you like using Oreos in dessert recipes or if you have leftovers you should try my Chocolate Oreo Lasagna, it’s always a hit. And these 4th of July Chocolate Covered Oreos are a fun addition to your patriotic parties.
Oreo pops make an amazing edible gift for Valentine’s Day, and can be adapted for any occasion. Be sure to read to the end so you can check out my seasonal suggestions!
To wrap these as gifts, place decorated pops in cellophane wrappers, add a tag and tie off with pink or red ribbon for a fun little treat.
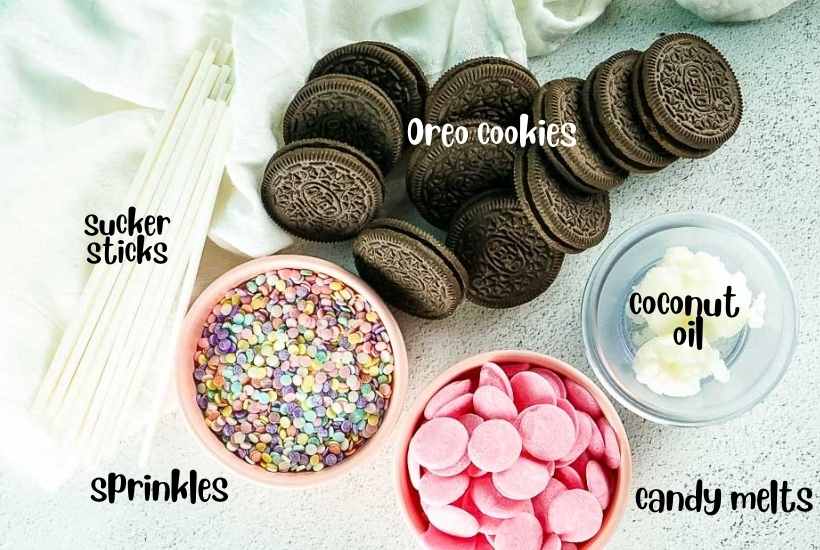
Ingredients Needed for Valentines Day Oreo Pops
- Oreos
- Pink Candy Melts – you can use other colors if desired
- Coconut Oil – using oil helps to thin the melted chocolate and keeps it smooth
- Pastel Confetti Sprinkle Mix
Gadgets Needed
- Parchment paper
- Baking sheet
- Lollipop sticks
- Microwave safe bowl to melt chocolate
- Frosting bag – if you don’t have piping bags, you can use ziptop bags
- Scissors – to snip the end of the bag
- Tall glass or dipping dish – one big enough to dip the Oreos in comfortably
Get the complete ingredients & directions in the recipe card below.
How to Make Oreos on a Stick (Valentine’s Themed)
Prep your cookie sheet by lining it with parchment paper.
Carefully separate the Oreos and line them on the pan. Depending on how many Oreo pops you’re making, you may need additional baking pans.
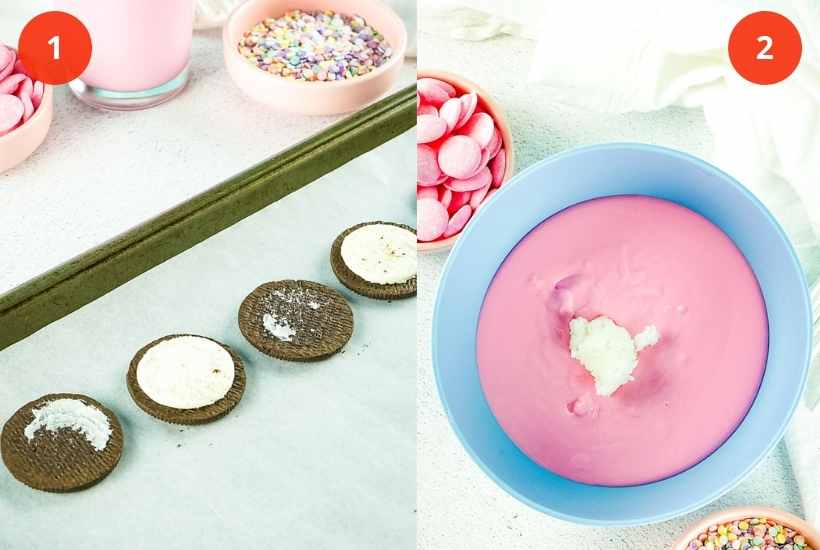
Melt the chocolate candies in a microwave-safe container for 3 minutes. Stir every minute and stop cooking if the candy melts are thinning quickly. You don’t want to overcook the chocolate.
Once the candy melts are smooth, add the coconut oil and stir until melted.
Dip each sucker stick into the chocolate and place them onto the cream filled side of the Oreos. They should be about halfway up the cookie. Quickly add the top of the Oreo, sandwiching the stick in, and press gently.
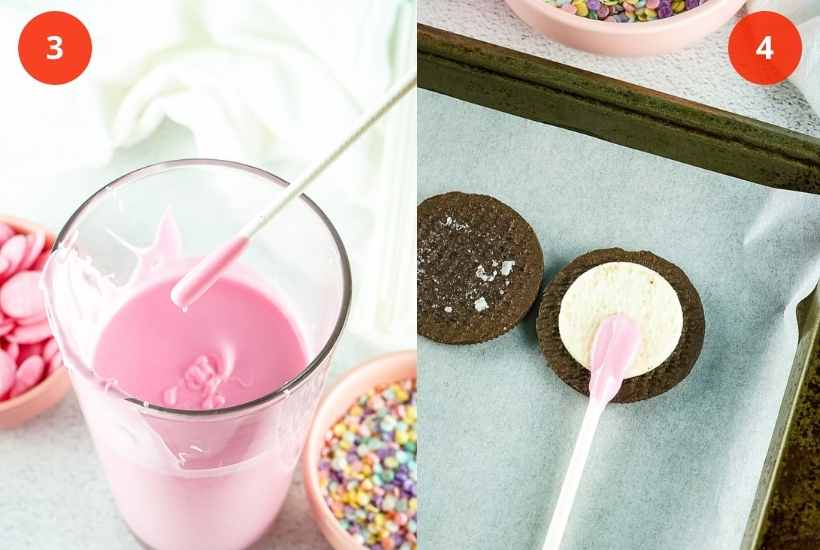
Let the Oreo pops rest for about 2 minutes, to allow time for the chocolate to set up.
Pour the remaining melted chocolate into a tall glass (a beer glass works great). You want one tall enough that you can easily dip the Oreo into it so it’s covered well.
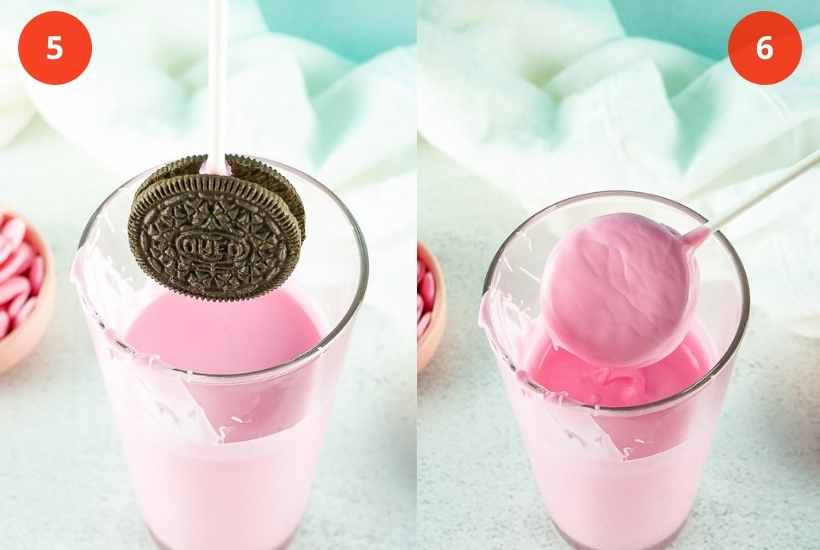
Holding onto the stick, dip each oreo pop into the chocolate, then tap it gently on the edge of the glass so the excess chocolate drips off.
Lay the chocolate dipped Oreo on a stick back on the baking pan and decorate with sprinkles.
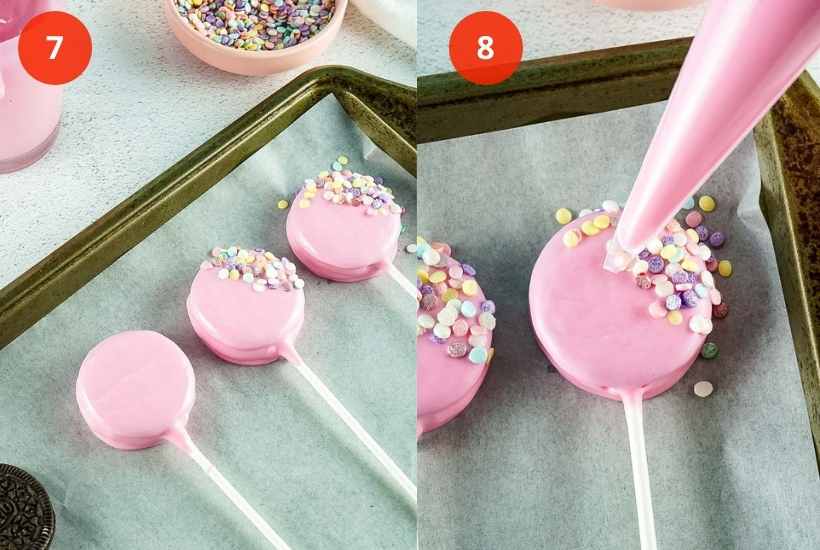
Once you have dipped all of the cookies, pour the remaining chocolate into a piping bag and cut the corner tip. Then finish decorating each Valentine pop by drizzling chocolate on the side without sprinkles.
After you have finished piping, let the chocolate dry for at least 10 minutes before serving, storing, or packaging as an edible gift.

Tips For Working With Melted Chocolate & Dipped Cookies
- If you find too much chocolate sticking to the pops, add a little more coconut oil and heat for a few seconds until the desired consistency is reached.
- Make sure you don’t thin the chocolate too much. You want it to completely cover the cookie. The chocolate is a light pink and the sandwich cookie is very dark so you want it a bit on the thicker side.
- If you prefer the coated pops don’t dry flat on the back, you can place them in a sucker or cake pop stand to dry instead of using a sheet pan.
Can I Use Double Stuffed Oreos Instead?
I haven’t tried them with this recipe, but they might work. I would test one before committing to a full batch. The main concern I have with the double stuffed filling is that they may be a little too heavy for the lollipop sticks.
To Make the Oreo Pops Set Faster, Can I Refrigerate or Freeze Them?
This is not recommended because of the condensation that may accumulate on the cookie pops. It also makes decorating more difficult and the presentation isn’t as pretty.
If you want to store them in the fridge or freezer after you have decorated them, you certainly can.

Making Oreos on a Stick for Other Holidays
These are such an easy and fun holiday dessert. Here are some other suggestions if you want to make them for other occasions.
Easter – use a variety of pastel candy melts for the chocolate base color. You can also break the Oreos in half and add them to the tops to make bunny ears. If regular Oreos are too big, grab the mini snack packs.
St. Patrick’s Day – Pick out several shades of green for the dipping chocolate paired with a festive sprinkle mix. Once you are done dipping and before the chocolate sets, add a gold coin towards the top.
Patriotic – These would be really fun to make. Melt red, white, and blue candy melts for the base then show them off by placing them on a stand.
Christmas – pipe on simple trees on the flat side of the cookies after coating with your holiday base color.
Halloween – There are so many fun designs you could make for Halloween! Turn the Oreo pops into pumpkins, mummies, Frankensteins, and more. Get more dessert inspiration from the Halloween Charcuterie Dessert Board.
Oreo flavors – have fun experimenting with different flavors of Oreos. I’ve used lemon and birthday cake flavors with good results.
More Easy Festive Dessert Ideas:
- Red White and Blue Charcuterie Board (Desserts)
- Bunny Bait Easter Snack Mix {No Bake}
- Red White and Blue Oreo Balls
- Grinch Edible Sugar Cookie Dough
- Cornflake Wreaths {No Bake}
- Chocolate Covered Cookie Dough Bites

This recipe was featured at Create, Bake, Grow & Gather and Love Your Creativity.
Enter your email & I’ll send it to your inbox. Plus, get great new recipes from me every week!

Valentine’s Day Oreo Cookie Pops
Equipment
- Scissors
Ingredients
- 12 Regular Oreos
- 12 Ounces Pink candy melts, (1 bag)
- 1 Tablespoon Coconut oil
- Pastel confetti sprinkle mix
Instructions
- Prepare a baking sheet by lining with parchment paper.
- Separate the Oreos by twisting apart. Place them on the prepared pan (you may need more than one pan depending on how many you are making).
- Place candy melts in a microwave-safe bowl and cook on high for 3 minutes, pausing every minute to stir. Once the chocolate is smooth, add the coconut oil and stir until combined.
- Dip your lollipop sticks into the melted chocolate and place them about halfway up the middle of the cream side of the Oreo. Replace the top of the Oreo, pushing down gently to press the stick into the filling. Allow cookies to sit for about 2 minutes or until dry.
- Pour the remaining chocolate into a tall glass that’s wide enough to fit the cookie.
- Dip each Oreo into the chocolate, tapping a couple times on the edge of the cup so the excess chocolate will drip off.
- Place the chocolate coated Oreo back on the baking sheet and immediately add sprinkles to the left diagonal portion of the cookie.
- Repeat with remaining cookies.
- Place the remaining chocolate in your frosting bag and use scissors to cut off a very small tip from the bag.
- Make diagonal strips on the lower right portion of the Oreo, in line with the sprinkles (do not cover the sprinkles).
- Allow the Oreos to sit for about 15 minutes or until hardened.
Notes
- If your chocolate is on the thick side, add a little more coconut oil to thin it out.
- The chocolate sets up quickly so you’ll need to work fast to add the sprinkles before the chocolate hardens.
- We don’t recommend refrigerating to speed up the chocolate hardening process due to possible condensation accumulating on the pops.
- You can set the coated pops in a cake pop stand if you don’t want a flat back.
- Package in cello bags with ribbons and a tag for a cute edible gift idea.
- Change the candy melt color and sprinkles for other holidays and occasions.
- Swap out for flavored Oreos if desired.
Nutritional Estimate
Nutritional information is provided as a reference, using an online calculator. We recommend verifying the information independently for accuracy.


Love the tip of placing the melted chocolate in a glass for easy dipping!
Don’t forget to join us over at the Creatively Crafty Linky Party every Wednesday through Sunday
creativelybeth.com/creative-crafts-linky-party-2/
Pinned!
Creatively, Beth
Thanks! It definitely makes it easier to dip the cookie pops.
These look almost too pretty to eat. Love them for Valentine’s Day. I am happy to feature them at Love Your Creativity.
Thanks for featuring my Oreo Pops recipe Linda!
Lori, your Valentine pops look super cute ♥
Thank you for sharing your recipe at our Create, Bake, Grow & Gather party this week. I’m delighted to be featuring your Valentine Pops at today’s party and pinning too.
Hugs ~ Kerryanne
Thank you for featuring my recipe, Kerryanne!
Oh my goodness; these are so lovely!